
Increasing the RAM aids in speeding up and even boosting your phones speeds. Just by altering some adjustments on your SD Card and 2 programs, you can get faster speeds and better performance from your Android Device(s).
As everyone already knows, Android is the largest brand in alteration and advanced modification. Provided that you already have rooted your Android device, then reading this tutorial will provide you with more knowledge on how you can easily increase your Android’s RAM without making any changes onto your hardware.
The simplest way to provide more RAM to your android device, is right here in this article. Simply follow the process below. However, you must be informed of the requirements before you begin in order to perform the operation.
Requirements:
*Rooted Android Device (Tablet | Phone)
*SD Card (Must by at least 4GB & Class 4)
*SD Card Reader
*Windows-Based Computer
Now the process of alteration can be followed once you have all of the information. Please be sure that your SD card is properly formatted and blank. If you have any images on your SD Card, I encourage you to save them onto your computer and/or an online source like DropBox.
Step 1)
This process requires you to download and install a specific software on your computer. The software is called Mini Tool Partition. This software will allow you to perform a partition of your SD Card. You must insert your SD Card into the SD Card Reader on your desktop or laptop.
Step 2)
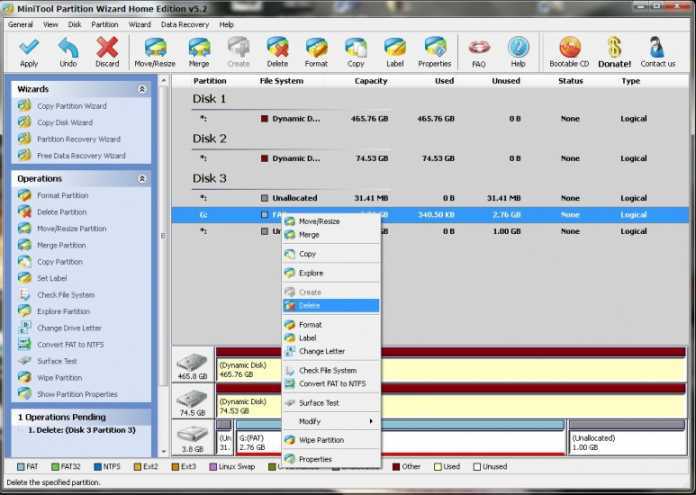
You will need to open the Mini Tool Partition, and on the Disk Selection window, select your SD Card. Right Click on the desired SD Card and click on Delete. Basically this version of Delete will format your SD Card to work properly.
Step 3)
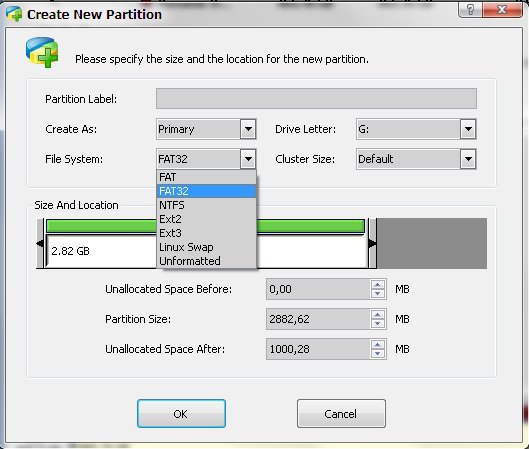
Now that you have formated your SD Card, you can right-click on the respective SD Card selection and then select Create. This will then create special partitions. However, if your SD Card is below 4GB, you may want to select the “FAT” partition; if you have a bigger SD Card, you can opt-in for the FAT 32.
Step 4) **Note, it is crucial to follow this next step exactly, other wise, you may end up corrupting your SD Card.**
Now that you have selected the proper File System, you can simply drag the size as well as the location. Please leave the 1000MB on the Unallocated Space. The rest is for the partitioning size. Now you can select OK.
Step 5)
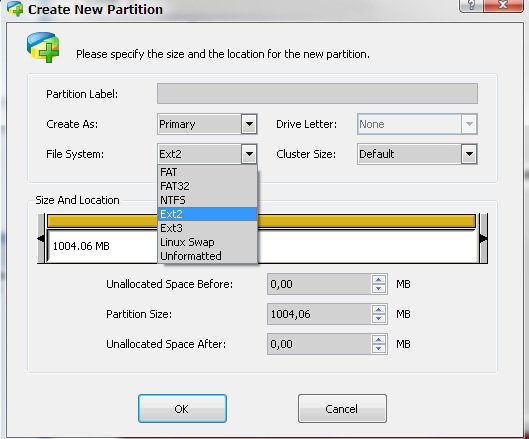
Since you have left the 1000MB unallocated space, this will allow it to get it located properly. Right-Click on the SD Card selection and select Create. Select the Primary just as the same on the previous and then you need to select Ext2, not FAT32. During this, you should not to leave any unallocated space. Now you can click OK, Done.
Step 6)
Now the editing of the partitioning of your SD Card is completed. You can simply click on the Apply button located at the top left corner of the Mini Tool Partition Wizard. Eject your SD Card, and proceed onto placing it into your desired Android Device.
Step 7)
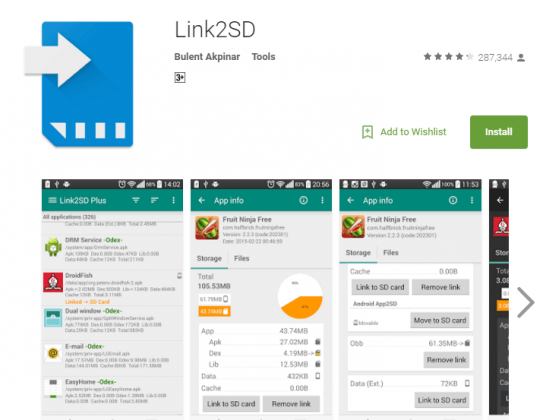
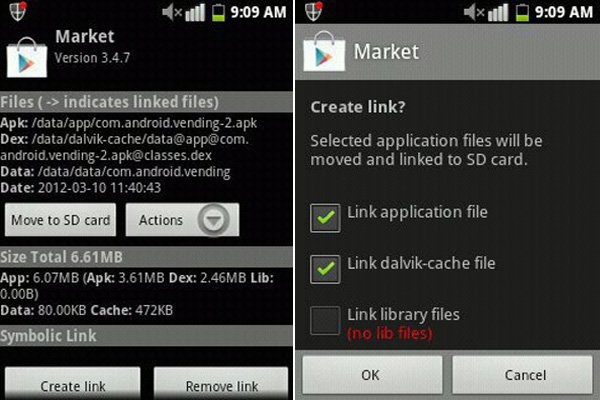
Now you need to download and install “Link2SD”. This can be found on the Google Play Store from your mobile device.
Step 8)
Simply open up the new downloaded application, where it will then ask you for the Rooted Device. You will have to stop the process and ensure your Android device is, before you can continue.
After that, the application will ask for the file system, such as .Ext partition. Just select the Ext2 selection that you had created during the Mini Tool Partition process. Then select OK.
Step 9)
Now you need to prepare the application in order to take the partitioned space in which we have taken the 1000MB. Then you can link them all together.
As mentioned at the beginning of the article, we are not adding any type of hardware. Instead, we are just increasing the RAM inside your Android by means of utilizing your own SD Card. The whole process should only take approximately 10-50 minutes to perform.
Sources: CodingSec, DropBox, CNet, Google Play Store.
This article (Increasing the RAM in your Android Devices with Your SD Card) is a free and open source. You have permission to republish this article under a Creative Commons license with attribution to the author and AnonHQ


This works fine … here they show U one way how to do it … But ur Phone or Tablet MUST ! be rooted and also run under Andoid …there is no way under bill gates OS
You are adding ROM and not RAM.
Adding ROM? Do you even know what ROM is?
@DJ El-Moriya Rooted as it should be 🙂
@Ricardo ROM stands for read only memory, which is not correct. The correct statement is that it is regular memory, utilized in a non traditional way.
@anon Ricardo’s right, he’s adding ROM, not RAM. ROM stands for read only memory but didn’t mean it since ages. ROM only means that memory persists after cut of power, and all flash storages (which include the SD card) do so. It’s hardware, no soft, you can’t change it.
RAM stands for random accessible memory and, as for ROM, it doesn’t really mean it anymore. Indeed, all the memory in your phone have random access, so it should not be a criterion anymore.
Whatever we still call RAM the cache between proc and flash. To be precise , it’s a DRAM.
We still call ROM the flash that holds all your data. In fact it’s a NVRAM.
Have a nice day everyone!
Still, it’s not ROM. The name says it; read only. It wouldn’t work if it were read only… so indeed, the correct name is non volatile RAM.
Ricardo is right. you are increasing the internal phone memory for more apps to be installed, but not the RAM in which the apps are loaded in when the are running
I think your all wrong. LOL An SD Card is Flash memory and can act as both Ram and Rom Dummies(dot)com says it this way “Flash memory: A special type of memory that works like both RAM and ROM. You can write information to flash memory, like you can with RAM, but that information isn’t erased when the power is off, like it is with ROM.” – What the above trick is actually doing is setting up a virtual memory swap file on your SD card to use a virtual ram. This is no different than adding more virtual ram to a pc through tools like eboost and a flash drive. The system will use the SD card’s physical space to temporarily store data that would otherwise be held in ram when the ram usage is high. This relieves the ram of a heavy work load thus freeing up ram and allowing you to have it when you need it most.
I haven’t looked at the architecture of the Android phones but you may be adding more RAM but not necessarily increasing the speed. The bus width, bus frequency and read/write times are typical slower than your RAM. Furthermore the OS week attempt to load up as much as the programs to fill all existing RAM and this will miss than introduce latency and extended wait states.
Misleading title. At first I was thinking swap space but it looks like you’re just making a way to run more programs from the sd card then what is normally permitted. This is just expanding the existing internal storage to the sd card for apps.
This does not increase the amount of programs one can run at a time. RAM != Flash Storage
Should my android root, to do this?
In no way this is RAM. U r increasing ROM size (not physically), but by adding SD card as ROM partition.
Would this work on the new $50 Kindle fire that has a memory slot?
So this is sort of like what “Page file” is for window Pcs? Basically you increase the page file allocation, to allot that memory you just added, to make it use like virtual ram in case the ram utilization is way above the usual threshold level?
can i increase the 1000mb partition (unallocated –> ext2)? as i get it, this is the partition android uses?e.g.: 4gb sd card, 2gb fat and 2gb ext2?
I cant do anything at step5
Beware though, that running system apps from an SD card is way slower than running it from built in high speed memory.
On pc its called SWAP aka PAGE file, id say thats a proper name for this
As others already said what is done here is to use SD-card space to increase the internal flash storage of the phone.
Page file under windows is rather like swap under linux, this would really give you more RAM evenso much slower.
the technique described here is not swap and so also different from the windows pagefile, evenso swap on another partition (of the type linux-swap) on the same SD-card could be also possible evenso it puts a lot of stress on the SD-card and might reduce its lifetime, but all this is another story and should be told somewhere else, evenso it sounds like an interesting idea.
WTF is with all the ‘evenso’. You are likely to torture small animals then move on to larger prey.
Works like swap in linux based os?
i success untill the link2SD but when it ask about ext partition ,i click ext2,but then it says mount script error,cannot be created…..mount: operation not supported on transport endpoint
Change ext2 to ext4 on step5 & step8.
i can not do step 9. what is that market app??
May have completely ruined my alienware 15 laptop. I got to the apply step and it gave me the option to restart computer to complete and now I can’t start my computer it only shows this no idea how to get out of it very concerned now please help. It’s saying no bootable devices
I figured out my problem. However now im curious about the comment regarding ext4 I’m using a Windows 10 alienware 15 laptop should i keep it as ext2?
I’ve gotten to step 8
I’m unsure how to complete step 9
I’m using a t95m android tv box and I have an Alienware 15 laptop windows 10
Okay it says after I select ext2
Mount script error – mount script cannot be created – mount: No such file or directory
Not sure what ive done wrong when viewing in mini partition everything looks right